Tuesday 8 August 2017

Implement Computed Column and Virtual fields in Dynamics 365 for operations

This article provides information about computed and virtual fields, which are the two types of unmapped fields that a data entity can have. The article includes information about the properties of unmapped fields, and examples that show how to create, use, and test them.

Overview

A data entity can have additional unmapped fields beyond those that are directly mapped to fields of the data sources. There are mechanisms for generating values for unmapped fields:
  • Custom X++ code
  • SQL executed by Microsoft SQL Server
The two types of unmapped fields are computed and virtual. Unmapped fields always support read actions, but the feature specification might not require any development effort to support write actions.

Computed field

  • Value is generated by an SQL view computed column.
  • During read, data is computed by SQL and is fetched directly from the view.
  • For writes, custom X++ code must parse the input value and then write the parsed values to the regular fields of the data entity. The values are stored in the regular fields of the data sources of the entity.
  • Computed fields are used mostly for reads.
  • If possible, it's a good idea to use computed columns instead of virtual fields, because they are computed at the SQL Server level, whereas, virtual fields are computed row by row in X++.

Virtual field

  • Is a non-persisted field.
  • Is controlled by custom X++ code.
  • Read and write happens through custom X++ code.
  • Virtual fields are typically used for intake values that are calculated by using X++ code and can't be replaced by computed columns.

Properties of unmapped fields

CategoryNameTypeDefault valueBehavior
DataIsComputedFieldNoYesYes
  • Yes – The field is synchronized as a SQL view computed column. Requires an X++ method to compute the SQL definition string for the column. The virtual column definition is static and is used when the entity is synchronized. After that, the X++ method is not called at run time.
  • No – The field is a true virtual field, where inbound and outbound values are fully controlled through custom code.
DataComputedFieldMethodStringA static DataEntitymethod in X++ to build the SQL expression that will generate the field definition. This property is disabled and irrelevant if the property IsComputedField is set to No. The method is required if the property IsComputedField is set to Yes.
DataExtendedDataTypeString

Example: Create a computed field

In this example, you add a computed field to the FMCustomerEntity entity. For reads, the field combines the name and address of the customer into a nice format. For writes, your X++ code parses the combined value into its separate name and address values, and then the code updates the regular name and address fields.
  1. In Microsoft Visual Studio, right-click your project, and add the existing FMCustomerEntity.
  2. In Solution Explorer, right-click the FMCustomerEntity node, and then click Open.
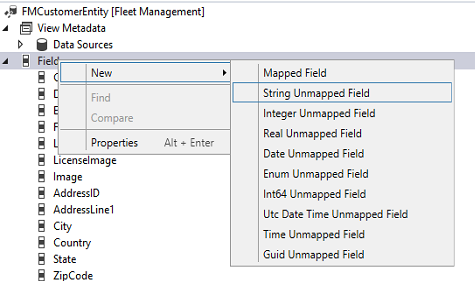
  3. In the designer for FMCustomerEntity, right-click the FMCustomerEntity node, and then click New > String Unmapped FieldCreating a new string unmapped field
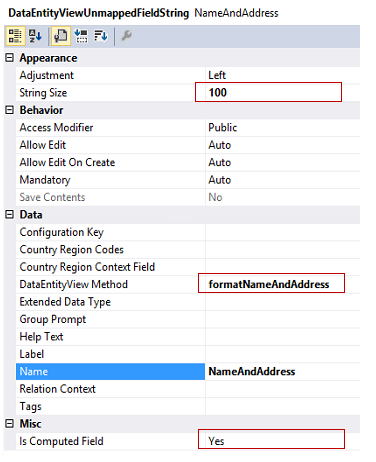
  4. Rename the new field NameAndAddress.
  5. Update properties of the NameAndAddress unmapped field, as shown in the following screenshot. Updating the properties of the NameAndAddress unmapped field
  6. Go to FMCustomerEntity > Methods. Right-click the Methods node, and then click New. Ensure that the method name matches the DataEntityView Method property value of the unmapped computed field.
  7. Paste the following X++ code into the method. The method returns the combined and formatted NameAndAddress value. Note: The server keyword is necessary.
    private static server str formatNameAndAddress()   // X++
    {
        DataEntityName      dataEntityName= tablestr(FMCustomerEntity);
        List                fieldList = new List(types::String);
        ////Format name and address to look like following
        ////John Smith, 123 Main St, Redmond, WA 98052
        fieldList.addEnd(SysComputedColumn::returnField(DataEntityName, identifierstr(FMCustomer), fieldstr(FMCustomer, FirstName)));
        fieldList.addEnd(SysComputedColumn::returnLiteral(" "));
        fieldList.addEnd(SysComputedColumn::returnField(DataEntityName, identifierstr(FMCustomer), fieldstr(FMCustomer, LastName)));
        fieldList.addEnd(SysComputedColumn::returnLiteral("; "));
        fieldList.addEnd(SysComputedColumn::returnField(DataEntityName, identifierstr(BillingAddress), fieldstr(FMAddressTable, AddressLine1)));
        fieldList.addEnd(SysComputedColumn::returnLiteral(", "));
        fieldList.addEnd(SysComputedColumn::returnField(DataEntityName, identifierstr(BillingAddress), fieldstr(FMAddressTable, City)));
        fieldList.addEnd(SysComputedColumn::returnLiteral(", "));
        fieldList.addEnd(SysComputedColumn::returnField(DataEntityName, identifierstr(BillingAddress), fieldstr(FMAddressTable, State)));
        fieldList.addEnd(SysComputedColumn::returnLiteral(", "));
        fieldList.addEnd(SysComputedColumn::cast(
            SysComputedColumn::returnField(DataEntityName, identifierstr(BillingAddress), fieldstr(FMAddressTable, ZipCode)), "NVARCHAR"));
        return SysComputedColumn::addList(fieldList);
    }
    
    T-SQL for the computed column.
    ( Cast (( ( T1.firstname ) + ( N' ' ) + ( T1.lastname ) + ( N'; ' ) +
                ( T5.addressline1 )
            + ( N', ' ) + ( T5.city ) + ( N', ' ) + ( T5.state ) + (
            N', '
            ) +
                ( Cast(T5.zipcode AS NVARCHAR) ) ) AS NVARCHAR(100))
    )
        AS
    NAMEANDADDRESS
    
    Tip: If you receive error in data entity synchronization because of computed columns, it's easier to come up with the SQL definition in Microsoft SQL Server Management Studio (SSMS) before using it in X++.
  8. Rebuild the project.
  9. Synchronize the database. Don't forget this step. You can do this by going to Dynamics 365 **> **Synchronize database > Synchronize.

Example: Create a virtual field

In this example, you add a virtual field to the FMCustomerEntity entity. This field displays the full name as a combination of the last name and first name. X++ code generates the combined value.
  1. In the designer for the FMCustomerEntity entity, right-click the Fields node, and then click New > String Unmapped Field.
  2. In the properties pane for the unmapped field, set the Name property to FullName.
  3. Set the Is Computed Field property to No. Notice that you leave the DataEntityView Method empty. Setting the properties for the unmapped field
  4. In the FMCustomerEntity designer, right-click the Methods node, and then click OverridepostLoad. Your X++ code in this method will generate the values for the virtual field.
  5. Paste the following X++ code in for the postLoad override. Notice that the postLoadmethod returns void.
    public void postLoad()
    {
        super();
        //Populate virtual field once entity has been loaded from database
        //Format full name - "Doe, John"
        this.FullName = this.LastName + ", " + this.FirstName;
    }
    
  6. Compile your project.

Example: Use a virtual field to receive and parse an inbound field

Imagine that an external system sends the name of a person as a compound value that combines the last and first names in one field that comes into our system. However, our system stores the last and first names separately. For this scenario, you can use the FullName virtual field that you created. In this example, the major addition is an override of the mapEntityToDataSourcemethod.
  1. In the designer for the FMCustomerEntity, right-click the Methods node, and then click Override > mapEntityToDataSource.
  2. Paste the following X++ code in for the mapEntityToDataSource method.
    public void mapEntityToDataSource(DataEntityRuntimeContext entityCtx, DataEntityDataSourceRuntimeContext dataSourceCtx)
    {
        super(entityCtx, dataSourceCtx);
        //Check if desired data source context is available
        if (dataSourceCtx.name() == "FMCustomer")
        {
            FMCustomer dsCustomer = dataSourceCtx.getBuffer();
            //Find position of "," to parse full name format "Doe, John"
            int commaPosition = strfind(this.FullName, ",",0,strlen(this.FullName));
            //Update FirstName and LastName in the data source buffer to update
            dsCustomer.LastName = substr(this.FullName,0,commaPosition-1);
            dsCustomer.FirstName = substr(this.FullName, commaPosition+1, strlen(this.FullName));
        }
    }
    
    Note: When update is called, mapEntityToDataSource methods are invoked for each data source.

Test the computed and virtual fields

The following main method tests your computed and virtual fields. Both fields are tested in a read action, and the virtual field is tested in an update action.
  1. For this example, ensure that you have the data set named Fleet Management (migrated). The data set is available from the dashboard in the browser. Click the menu icon in the upper-right corner, click the APP LINKS menu, and then scroll to find the data set named Fleet Management (migrated).
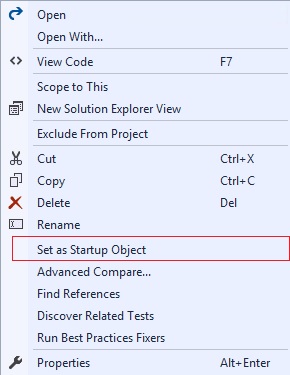
  2. Paste the following X++ code into the startup object of your project. Run your project.
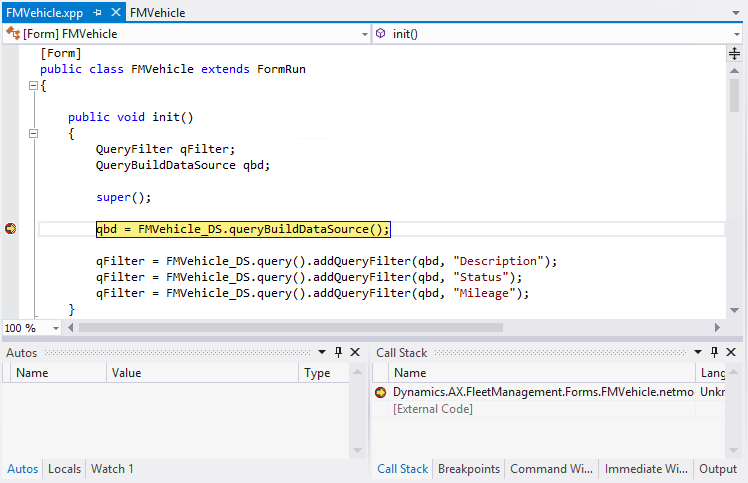
    public static void main(Args _args)   // X++
    {
        FMCustomerEntity customer;
        //Using transactions to avoid committing updates to database
        ttsbegin;
        //SELECT single customer entity record from the database
        select customer
            where customer.Email == "phil.spencer@adatum.com";
        //Read full name (Virtual Field)
        info(customer.FullName);
        //Read formatted NameAndAddress(computed Field)
        info(customer.NameAndAddress);
        //UPDATE full name (virtual field)
        customer.FullName = "Doe, John";
        customer.update();
        //Reselect data from database to get updated information
        select customer
            where customer.Email == "phil.spencer@adatum.com";
        //Read full name (virtual field)
        info(customer.FullName);
        ttsabort;
    }
Refer https://docs.microsoft.com/en-us/dynamics365/unified-operations/fin-and-ops/index for more info.

Monday 7 August 2017

Display method in Dynamics 365 for operations

Hi All,
This posts helps you to understand and create a "display"  method for the table extension.
Lets say, the requirement is to add a method in the standard table, it can be achieved either by creating a table extension.
So in this scenario we had a requirement to add a display method in the standard table "CustTrans".
In Dynamics 365 we wont be able to add the new method or modify the existing method to the standard table or to an extension table.
It can be achieved by using the extension class.
Step 1: Create a new class and name it as <Classname>_<Extension>.
<Class-name> - can be any name, but it is preferred to give the table name for which the extension is being created. 
postfix <_Extension> is must.
public static class CustTrans_Extension
{
}
Step 2 : Now add the display methods in the class which is required to be shown.
public static class CustTrans_Extension
{
[SysClientCacheDataMethodAttribute(true)]
public static display AgreementId agreementId(CustTrans _this)
{
LedgerJournalTrans ledgerJournalTrans;
select ledgerJournalTrans
where ledgerJournalTrans.TransactionType == LedgerTransType::Payment &&
LedgerJournalTrans.CustTransId == _this.RecId;

return ledgerJournalTrans.AgreementId;
}
}
Step 3: To use this display method in the form.
Create a string control in the form design and set the following properties
Data source: CustTrans
DataMethod: CustTrans_Extension::agreementId
CacheDataMethod: Yes
Below is the screen shot for reference.
Step 4: Build/Rebuild the project/solution and check the output in the URL.

Debugging code in Dynamics 365 for Operations

This topic reviews how you can debug X++ code by using the debugging feature in Microsoft Visual Studio.
To debug X++ code, you use the debugger in Microsoft Visual Studio. The process is similar to the process that is used for any other application that is created in Visual Studio. For example, the standard tools for examining the application are available when your code is stopped at a breakpoint.

Debug your code

To debug X++ code, follow these steps.
  1. In Visual Studio, open the X++ code to debug.
  2. Find the line or lines where you want execution to stop, and set breakpoints in those lines. To set a breakpoint in a line, click in the left column of the code editor or press F9 while the cursor is on that line. A red dot indicates that a breakpoint has been set.
    Red dot
  3. Set a startup project and a startup object. Startup objects can be any form, any class that has the main method, or any menu item. You can set the startup object in the Properties pane for the project. Alternatively, right-click the element in Solution Explorer, and then click Set as Startup Object.
    Set as startup object
  4. On the Debug menu, click Start Debugging.
  5. In the application, perform the action that causes the code that you're interested in to run. Typical actions include opening a form. Processing stops at the breakpoints that you set.
    Run
  6. Use the tools in Visual Studio to examine the application. For example, you can hover over variables in the X++ code to see their values. You can also use commands on the Debug menu to step through the code. Additionally, tools such as the Autos pane in Visual Studio will show important information about the state of the application.
    Hover
    Another tool that is specific to Finance and Operations is the Infolog. Often, info()statements are added to code to log status messages while the application is running. You can view these Infolog messages directly in Visual Studio. On the View menu, click Infolog.
    Infolog
  7. After you've finished debugging the application, exit Finance and Operations . Visual Studio will exit debugging mode.

Friday 4 August 2017

Exporting Data to an Excel Using X++ in Dynamics 365 for Operations

    Here In D365 we don't have SysExcelApplication, we can use OfficeOpenXml Namespace to do this.  

    using System.IO;
    using OfficeOpenXml;
    using OfficeOpenXml.Style;
    using OfficeOpenXml.Table;
    class CustExport
    {
             public static void main(Args   _args)
        {
       
            CustTable custTable;
            MemoryStream memoryStream = new MemoryStream();

            using (var package = new ExcelPackage(memoryStream))
            {
                var currentRow = 1;

                var worksheets = package.get_Workbook().get_Worksheets();
                var CustTableWorksheet = worksheets.Add("Export");
                var cells = CustTableWorksheet.get_Cells();
                OfficeOpenXml.ExcelRange cell = cells.get_Item(currentRow, 1);
                System.String value = "Account Number";
                cell.set_Value(value);
                cell = null;
                value = "Currency";
                cell = cells.get_Item(currentRow, 2);
                cell.set_Value(value);

                while select CustTable
                {
                    currentRow ++;
                    cell = null;

                    cell = cells.get_Item(currentRow, 1);
                    cell.set_Value(CustTable.AccountNum);
                    cell = null;

                    cell = cells.get_Item(currentRow, 2);
                    cell.set_Value(CustTable.Currency);
                }
                package.Save();
                file::SendFileToUser(memoryStream, "Test");
         
            }
     
        }

}

Create Custom Number sequence in Dynamics 365 for operations

In AX2012 or AX 2009 we directly write code on existing number sequence class​​ but in AX (7) new version need to create new class and required extend to NumberSeqApplicationModule and required delegate method for mapping.

1. Create EDT ChangeId.
2. Add EDT to Table ChangeLog.
3. Create new Table method numRefChangeId().
public class ChangeLog extends common
{
   static NumberSequenceReference numRefChangeId()
    {
        return NumberSeqReference::findReference(extendedTypeNum(ChangeId));
    }
}
​4. Create New Class NumberSeqModuleRisk and extend NumberSeqApplicationModule​ and a delegate method.
Picture
lass NumberSeqModuleRisk extends NumberSeqApplicationModule
{
    public void initializeReference(NumberSequenceReference _reference,
         NumberSeqDatatype _datatype, NumberSeqScope _scope)
    {
        #ISOCountryRegionCodes
        super(_reference, _datatype, _scope);

        switch (_datatype.parmDatatypeId())
        {
            case extendedTypeNum(ChangeId):
         
                if("USA")
                {
                    _reference.AllowSameAs = true;
                }
               /*if (SysCountryRegionCode::isLegalEntityInCountryRegion([#isoIT]))
               {
                   _reference.AllowSameAs = true;
               }*/
        }
    }

    protected void loadModule()
    {
        NumberSeqDatatype datatype = NumberSeqDatatype::construct();

        datatype.parmDatatypeId(extendedTypeNum(ChangeId));
        datatype.parmReferenceHelp(literalStr("Creating new ChangeId"));
        datatype.parmWizardIsManual(NoYes::No);
        datatype.parmWizardIsChangeDownAllowed(NoYes::No);
        datatype.parmWizardIsChangeUpAllowed(NoYes::No);
        datatype.parmWizardHighest(999999);
        datatype.parmSortField(1);

        datatype.addParameterType(NumberSeqParameterType::DataArea, true, false);
        this.create(datatype);     

    }

    public NumberSeqModule numberSeqModule()
    {
        return NumberSeqModule::Proj;
    }

    [SubscribesTo(classstr(NumberSeqGlobal),delegatestr(NumberSeqGlobal,buildModulesMapDelegate))]
    static void buildModulesMapSubsciber(Map numberSeqModuleNamesMap)
    {
        NumberSeqGlobal::addModuleToMap(classnum(NumberSeqModuleRisk), numberSeqModuleNamesMap);
    }
}

5. Write a job and run that
static void ChangeId(Args _args)
{
    NumberSeqModuleRisk numberSeqModuleRisk = new NumberSeqModuleRisk ();
    numberSeqModuleRisk .load();
}
6. Then run the wizard   Organization Administration -> CommonForms -> Numbersequences -> Numbersequences -> Generate -> run the wizard.

GO to Project management module -> setup -> Project management parameters form -> Num Seq
Picture
​7. Now create methods as shown on Form below.
Picture
[Form]
public class ChangeLog extends FormRun
{
    NumberSeqFormHandler numberSeqFormHandler;
    /// <summary>
    ///
    /// </summary>
    NumberSeqFormHandler numberSeqFormHandler()
    {
        if (!numberSeqFormHandler)
        {
numberSeqFormHandler=NumberSeqFormHandler::newForm(ChangeLog::numRefChangeId().NumberSequenceId,  element, ChangeLog_DS,   fieldNum(ChangeLog, ChangeId));
        }
        return numberSeqFormHandler;
    }
    public void close()
    {
        if (numberSeqFormHandler)
        {
            numberSeqFormHandler.formMethodClose();
        }
        super();
    }

    [DataSource]
    class ChangeLog
    {
        public void create(boolean _append = false,
                           boolean _extern = false)
        {
            element.numberSeqFormHandler().formMethodDataSourceCreatePre();

            super(_append);
            if (!_extern)
            {
                element.numberSeqFormHandler().formMethodDataSourceCreate(true);
            }

        public void write()
        {
            super();
            element.numberSeqFormHandler().formMethodDataSourceWrite();
        }
        public boolean validateWrite()
        {
            boolean         ret;
            ret = super();
            ret = element.numberSeqFormHandler().formMethodDataSourceValidateWrite(ret) && ret;
            if (ret)
            {
                ChangeLog.validateWrite();
            }
            return ret;
        }
        public void linkActive()
        {
            element.numberSeqFormHandler().formMethodDataSourceLinkActive();
            super();
        }

        public void delete()
        {
            element.numberSeqFormHandler().formMethodDataSourceDelete();
            super();
        }
    }
}

Now our custom number sequence is generated. Open your Form and check Num Seq by creating new record on your filed.

​ Reference: https://community.dynamics.com/ax/b/daxseed/archive/2016/11/17/ax-7-custom-number-sequence

Tuesday 1 August 2017

Vendors Merge In Microsoft Dynamics AX 2012

static void vendorsMerge(Args _args)
{
    VendTable                                   vendTable;
    VendTable                                   vendTableDelete;
    PurchJournalAutoSummary                     journalSummary;
    RetailVendTable                             retailVendTable;

    DimensionAttributeValue                     dimensionAttributeValue;
    DimensionAttributeLevelValue                dimensionAttributeLevelValue;
    DimensionAttributeValueGroup                dimensionAttributeValueGroup;
    DimensionAttributeValueCombination          dimensionAttributeValueCombination;
    DimensionAttributeValueGroupCombination     dimensionAttributeValueGroupCombination;

    #define.vend('1003')
    #define.vendDelete('US_TX_003')

    ttsbegin;
    delete_from journalSummary
        where journalSummary.VendAccount ==  #vendDelete;
    delete_from retailVendTable
        where retailVendTable.AccountNum == #vend;

    select firstonly forupdate vendTableDelete
        where vendTableDelete.AccountNum == #vendDelete;

    select firstonly forupdate vendTable
        where vendTable.AccountNum == #vend;

    select firstonly forupdate dimensionAttributeValueGroup
        join dimensionAttributeLevelValue
            where dimensionAttributeValueGroup.RecId == dimensionAttributeLevelValue.DimensionAttributeValueGroup
               && dimensionAttributeLevelValue.DisplayValue == #vendDelete;
    dimensionAttributeValueGroup.delete();

    select firstonly forupdate dimensionAttributeValue
        join dimensionAttributeLevelValue
            where dimensionAttributeValue.RecId == dimensionAttributeLevelValue.dimensionAttributeValue
               && dimensionAttributeLevelValue.DisplayValue == #vendDelete;
    dimensionAttributeValue.delete();

    select firstonly forupdate dimensionAttributeLevelValue
        where dimensionAttributeLevelValue.DisplayValue == #vendDelete;
    dimensionAttributeLevelValue.delete();

    select firstonly forupdate dimensionAttributeValueGroupCombination
        join dimensionAttributeValueCombination
            where dimensionAttributeValueCombination.RecId == dimensionAttributeValueGroupCombination.DimensionAttributeValueCombination
               && dimensionAttributeValueCombination.DisplayValue == #vendDelete;
    dimensionAttributeValueGroupCombination.delete();

    select firstonly forupdate dimensionAttributeValueCombination
        where dimensionAttributeValueCombination.DisplayValue == #vendDelete;
    dimensionAttributeValueCombination.delete();

    vendTableDelete.merge(vendTable);
    vendTable.doUpdate();
    vendTableDelete.doDelete();
    ttscommit;
    info("Vendor merging successfull");
}